データベースサーバーの設定
パッケージのインストール
PostgreSQL を利用する場合は、PostgreSQL本体や psycopg2 をインストールする。
$ sudo dnf install postgresql postgresql-server postgresql-devel pgadmin3
$ pip install psycopg2
データベースの作成
$ createdb -E UNICODE -U postgres database_name
データベースユーザーの作成
$ createuser -a -d -U postgres -P db_user_name
新しいロールのためのパスワード: <- db_user_name のパスワードを入力
もう一度入力してください: <- db_user_name のパスワード(確認)を入力
パスワード: <- postgres のパスワードを入力
テーブルの作成
データベースに必要なテーブルを作成すために、以下のコマンドを実行する。(以前の syncdb は廃止予定)
$ python manage.py migrate
Operations to perform:
  Synchronize unmigrated apps: staticfiles, messages
  Apply all migrations: admin, contenttypes, auth, sessions
Synchronizing apps without migrations:
  Creating tables...
    Running deferred SQL...
  Installing custom SQL...
Running migrations:
  Rendering model states... DONE
  Applying contenttypes.0001_initial... OK
  Applying auth.0001_initial... OK
  Applying admin.0001_initial... OK
  Applying contenttypes.0002_remove_content_type_name... OK
  Applying auth.0002_alter_permission_name_max_length... OK
  Applying auth.0003_alter_user_email_max_length... OK
  Applying auth.0004_alter_user_username_opts... OK
  Applying auth.0005_alter_user_last_login_null... OK
  Applying auth.0006_require_contenttypes_0002... OK
  Applying sessions.0001_initial... OK
テーブル作成の後に、認証システムで利用するスーパーユーザを作成しておく。
$ python manage.py createsuperuser
Username (leave blank to use 'tomoyan'):
Email address: tomoyan@tomoyan.net
Password:
Password (again):
Superuser created successfully.
Admin サイトを有効化する方法
言語の設定 (settings.py)
# Language code for this installation. All choices can be found here:
# http://www.i18nguy.com/unicode/language-identifiers.html
#LANGUAGE_CODE = 'en-us'
LANGUAGE_CODE = 'ja'
タイムゾーンの設定 (settings.py)
# Local time zone for this installation. Choices can be found here:
# http://en.wikipedia.org/wiki/List_of_tz_zones_by_name
# although not all choices may be available on all operating systems.
# In a Windows environment this must be set to your system time zone.
#TIME_ZONE = 'UTC'
TIME_ZONE = 'Asia/Tokyo'
アプリの有効化設定 (settings.py)
Django 1.8.3 では標準で有効化されている。
INSTALLED_APPS = (
    ...
    # Uncomment the next line to enable the admin:
    'django.contrib.admin',
URL ディスパッチの設定(urls.py)
Django 1.8.3 では標準でディスパッチされている。
# Uncomment the next two lines to enable the admin:
from django.contrib import admin
urlpatterns = patterns('',
    ...
    # Uncomment the next line to enable the admin:
    url(r'^admin/', include(admin.site.urls)),
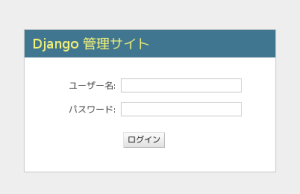
Admin サイトの表示
http://localhost:8000/admin/ にアクセスする。

管理タスク実行ユーティリティ(django-admin.py、manage.py)
django-admin.py は、Django の様々な管理タスクを実行するユーティリティである。
manage.py は Django プロジェクトを作成する際に自動生成される django-admin.py に対する軽いラッパーである。
コマンドのオプションに –help を加えることで、[subcommand] の種類を確認できる。または、[subcommand] –help をオプションに加えるとヘルプを確認できる。
$ python manage.py --help

Type 'manage.py help <subcommand>' for help on a specific subcommand.

Available subcommands:

[auth]
    changepassword
    createsuperuser

[django]
    check
    compilemessages
    createcachetable
    dbshell
    diffsettings
    dumpdata
    flush
    inspectdb
    loaddata
    makemessages
    makemigrations
    migrate
    runfcgi
    shell
    showmigrations
    sql
    sqlall
    sqlclear
    sqlcustom
    sqldropindexes
    sqlflush
    sqlindexes
    sqlmigrate
    sqlsequencereset
    squashmigrations
    startapp
    startproject
    syncdb
    test
    testserver
    validate

[sessions]
    clearsessions

[staticfiles]
    collectstatic
    findstatic
    runserver
subcommand には以下のようなものが存在する。
| startapp | アプリケーションの作成 | migrate | テーブルの作成 | ||
| createcachetable | キャッシュテーブルの作成 | ||||
| cleanup | compilemessages | createsuperuser | dbshell | diffsettings | |
| dumpdata | flush | inspectdb | loaddata | makemessages | |
| runfcgi | runserver | shell | sql | sqlall | sqlclear |
| sqlcustom | sqlflush | sqlindexes | sqlinitialdata | sqlreset | sqlsequencereset |
| test | testserver | validate | |||
アプリケーションの作成 (startapp)
プロジェクト内に新しいアプリケーションを作成するには以下のコマンドを実行する。
注意: プロジェクト名と同名のアプリケーションは作成できない。
$ python manage.py startapp app_name
| app_name フォルダ | |||
|---|---|---|---|
| + | migrations フォルダ | ||
| | | + | __init__.py | このフォルダがPythonパッケージであることをPythonに知らせる。 |
| + | __init__.py | このフォルダがPythonパッケージであることをPythonに知らせる。 | |
| + | admin.py | ||
| + | models.py | Django アプリケーションのモデルを定義するファイル。 | |
| + | tests.py | Django アプリケーションのテストを定義するファイル。 | |
| + | views.py | Django アプリケーションのビューを定義するファイル。 | |
テーブルの作成 (migrate)
※ syncdbは1.9で廃止予定
データベースにテーブルを作成するには以下のコマンドを実行する。
$ python manage.py migrate
メモ:
- migrate は、プロジェクト設定ファイルの INSTALLED_APPS 定義を参照して、アプリケーションのモデルで定義されているテーブル群を必要に応じて作成する。
- yes の入力を省略したい場合は –noinput を加えることができる。
[実行例]
$ python manage.py migrate
Operations to perform:
  Synchronize unmigrated apps: staticfiles, messages
  Apply all migrations: admin, contenttypes, auth, sessions
Synchronizing apps without migrations:
  Creating tables...
    Running deferred SQL...
  Installing custom SQL...
Running migrations:
  Rendering model states... DONE
  Applying contenttypes.0001_initial... OK
  Applying auth.0001_initial... OK
  Applying admin.0001_initial... OK
  Applying contenttypes.0002_remove_content_type_name... OK
  Applying auth.0002_alter_permission_name_max_length... OK
  Applying auth.0003_alter_user_email_max_length... OK
  Applying auth.0004_alter_user_username_opts... OK
  Applying auth.0005_alter_user_last_login_null... OK
  Applying auth.0006_require_contenttypes_0002... OK
  Applying sessions.0001_initial... OK
モデルの初期データを生成 (dumpdata)
アプリが利用するモデルに初期データを入れるには、予めフィクスチャ(fixture)を用意しておく必要がある。
以下のコマンドを実行すると、データベースのデータから json のフィクスチャを生成できる。
$ python manage.py dumpdata app_name --format=json --indent=2
[
  {
    "model": "myapp.person",
    "pk": 1,
    "fields": {
      "first_name": "John",
      "last_name": "Lennon",
    }
  },
  {
    "model": "myapp.person",
    "pk": 2,
    "fields": {
      "first_name": "Paul",
      "last_name": "McCartney",
    }
  },
]
キャッシュテーブルの作成 (createcachetable)
データベースにキャッシュテーブルを作成する。
$ python manage.py createcachetable django_cache_data
settings.py にキャッシュバックエンド設定を追加する。(データベース テーブルを指定)
$ CACHE_BACKEND = 'db://django_cache_data'